We will be creating only a dummy HCM extract here just to use the 'Initiate HCM Data Loader' feature as data extraction and transformation we are already doing in our BI report.
> My Client Group > Data Exchange > HCM Extracts > Extract Definitions
Use the + sign to create a new extract of type 'Inbound Interface'

>> In new releases this parameter is already there but hidden. Click on 'Show hidden parameters' and update the Default Value to "Y" and Save


For the Data Group I have taken "PER_EXT_ASG_STATUS_DETAILS_UE" as User Entity as it returns very less row count.

Save
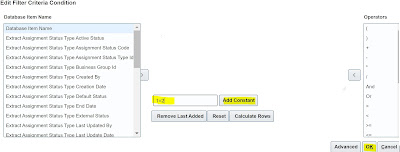
In Data group Filter criteria, I have put condition as "1=2" so that it doesn't return any data set
Edit > Put the condition 1=2 and 'Add Constant' and ‘Ok’
Save

In the Data Group create a Data Record and then a Dummy Attribute called "Dummy Field" with Data Type as "Text", Type "String" and string value has been passed as "Demo"
Dummy Record


Now for the Extract Delivery Option, you can pass the details as below :
Start Date : 01/01/1901
End Date : 12/31/4712
Delivery Option Name : HDLDemoOutput
Output Type : Text
Report : <pass the BI Report path here ;
Ex: /Custom/UoE Data Migration/UserCatHDLReport/HDLCallDemoRpt.xdo
Template Name : <pass the eText template name here;
Ex: HDLCallDemo
Output Name : HDLCallDemoOpt
Delivery Type : Inbound Interface
Required/Bursting Node : ticked

In the "Additional Details" section please pass the details as below :
Encryption Mode : None
Override File Extension : .dat
Run Time File Name : User
Integration Name : UserCategoryUpdate
Integration Type : Data Loader
Integration Parameters : blank
Key : blank
Locale : blank
Time Zone : blank
Compress : Yes Compress
Compressed Delivery Group: UserCatUpdate.zip
** Integration Name : 1st 8 characters will be used in the content ID name during the HDL call for this extract.
It starts with DL_<1st 8 characters from Integration Name in upper case>_ProcessID
EX: DL_USERCATE_1092672

Save
Now navigate to Home --> My Clients Groups > Data Exchange > HCM Extracts> Refine Extracts
Search for the dummy HCM Extract which has been created. Select the HCM Extract and click on the "Edit" button.

Once the HCM Extract is opened, in the "Tasks" tab, under Flow Task the HCM Extract name will be present. Now click on the "Actions" button and select the option "Select and Add".

A search popup will appear and search the task "Initiate HCM Data Loader" (Generate HCM Data Loader file and optionally perform a data load). Now select the task and click on the "Done" button.

Save
Now select the task "Initiate HCM Data Loader" click on the "Go to Task" button.
2 options will be there :
a> Data Loader Archive Action
b> Data Loader Configuration

Select the 1st option "Data Loader Archive Action".Click on the "Edit" button.
In the "Parameter Basis" dropdown, select the option "Bind to Flow Task".
In the "Basis Value" dropdown, select the option "Extract Name , Submit , Payroll Process"
Ex: HDLCallDemo, Submit, Payroll Process
Now select the 2nd option "Data Loader Configuration". Click on the "Edit" button.
In the "Parameter Basis" dropdown, select the option "Constant Bind".
In the "Basis Value" multiline text box, please provide the below details : ImportMaximumErrors=100,LoadMaximumErrors=100,LoadConcurrentThreads=8,LoadGroupSize=100

Now click on the "Next" button and then click on the "Submit" button. You might get error to compile the fast formula, please do so. You can ignore the warnings
It's time now to submit the HCM Extract and check the Inbound Interface process.
HCM Extracts > Submit Extract

You can check the
HCM Data Extracts > View Extract Results


Now check if it has triggered the HDL load or not
HCM Data Loader > Import and Load Data
‘Show filters’ and remove your User Name and search as it won’t be against your User. You can see the Data Set been called, content ID/Data Set Name explanation has given above.

Import and Load both are successful, so it's all good at the end :)


