Wednesday, October 28, 2020

HCM: Delete HCM Data Loader Stage Table Data

This job purges the HCM Data Loader staging tables for the data sets identified by the parameter values.

1> Either you can schedule this job 

*** Note: When you run the HDL job 1st time it checks whether the 'Delete HCM Data Loader Stage Table Data' job is scheduled or not. If not, then the HDL process creates a schedule for 'Delete HCM Data Loader Stage Table Data'  automatically.


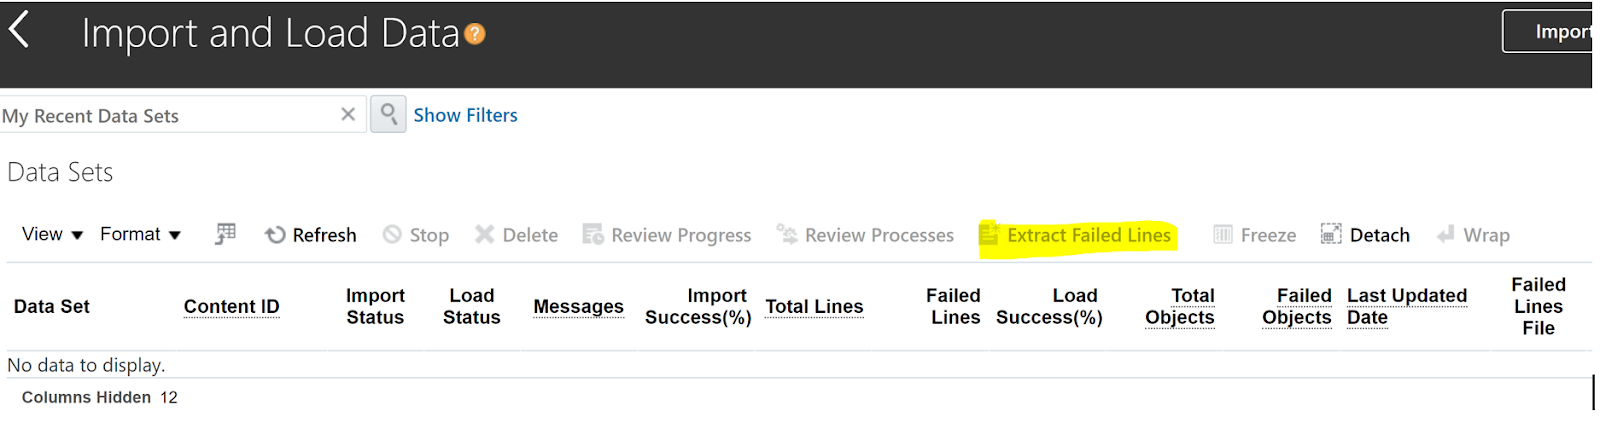
2> Or when you want to 'Delete' the load entry from the 'Import and Load Data' load list, it calls this job for that data set.


Friday, September 25, 2020

HCM: The Regular/Temporary and Full Time/Part Time fields default to Regular and Full Time for all workers

 While migrating the workers we noticed that 'Regular or Temporary' and 'Full Time or Part Time' are getting auto populated with default values 'Regular' and 'Full Time' even though we are not passing the values for these fields.

These values are coming from the Position assigned and the reason is 'Position Synchronization Configuration'. 

Navigation: Setup and Maintenance > Search > Manage Enterprise HCM Information


Now the problem was, we were not even providing these values in the position load and system was still populating these fields with default values. This seems to be a bug.

The workaround is to pass the #null values to FullPartTime & RegularTemporary fileds in the position load file.

So to rectify the assignment records, you need to update the positions first and then run the ''Synchronize Person Assignments from Position". This process would only work if "Allow Override at Assignment' flag is unchecked. If it is also checked unfortunately you have to update the assignment records.

HCM: Default Number, Date & Time Format

 These default formats are controlled by profile options.

Navigation: Setup and Maintenance > Manage Administrator Profile Values


Profile Option Code:

Number: FND_NUMBER_FORMAT

Date     : FND_DATE_FORMAT

Time    : FND_TIME_FORMAT

You can set these options on Site or User level from the list of values available as required.


HCM: Workers Auto Numbering & Duplication Check

 Auto numbering and person duplicate check options are available under enterprise information. You can amend as required 

Navigation: Setup and Maintenance > Search > Manage Enterprise HCM Information


'Enterprise Information' Section

Options are self explanatory for both number generation and duplicate check. 
If you want to start the person number from a specific range you can provide that value in the 'Initial Person Number' filed.


Wednesday, July 8, 2020

HDL: Extract Failed Lines

From version 20B there in an extra feature been added in the import load data section which is quite useful.

You can now generate the load file only for the failed rows from the import and load screen. You just need to enable this option

Setup and Maintenance > HCM Data Loader > Configure HCM Data Loader


It will enable the 'Extract Failed Lines' option on the Import and Load screen


Just to note that, it works quickly if number of failed line are less but it will take time in case of large volume of failed data.

Talend: Import/Export Items


Export: You can export multiple items from the project onto a directory or as an archive zipped file


1.       In the Repository tree view, select the items you want to export, you can have multiple selections as well


2.1 You can either go with the root directory or Archive file method. Root directory will create the files in the selected folder along with the parent tree structure

Export Dependencies check box exports the routine dependencies along with Jobs you are exporting (Ex: Related File Excel mappings, DB connection etc.)


2.1.1 It created the Project Name and the all the related job files.


2.2 Archive file option will create a ZIP file at the destination
      Export Dependencies check box exports the routine dependencies along with Jobs you are exporting


2.2.1 Zip file created


Import:

1    1.  Right click on the folder or Job design and select ‘Import items’


2.1. The Root directory option will create the structure the way it was exported. You can select individual items as well.
Overwrite existing items check box overwrites the existing items with those having the same names to be imported.


2.1.1 Result will be as like below


2.2 Archive file option will also give you the same result


Talend: tAggregateRow

tAggregateRow palette can be used to get the aggregate value of any column or to get column based on the unique key


Talend: tReplace

Use this palette to replace any column value with a new value


Talend: tSortRow

Use this for sorting the output


Tuesday, June 30, 2020

Talend: tUniqRow to Remove Duplicate Rows

tUniqRow Palette can be used to remove duplicate rows. You can define the unique row combination key in the Basic settings section.

Below, the keys attributes for a unique row are DateStart, PersonId and SourceSystemId


Talend: tFilterRow to Filter Null rows

tFilterRow Palette can be used to filter out unwanted rows from the output, here I am giving an example to filter out Null rows

Below, it is filtering out the rows where assignmentNumber is Null

In the 'Use advanced mode'
Relational.ISNULL(input_row.AssignmentNumber)?false:true


Talend: If Else Condition on tMap

In the recent ETL routine on the Talend job I had to compare two dates and select the greater one.

You have many predefined functions available on expression builder, I used TalendDate.compareDate function to compare the dates and If else condition to get the max one.

 Open the expression builder by clicking on three dots

Select the TalendDate.compareDate function and drag the date variables from the list 

TalendDate.compareDate(row2.ASS_START_DATE,row7.MGR_START_DATE)==-1?row7.MGR_START_DATE:row2.ASS_START_DATE 

Here, compareDate returns -1 if argumen1 is less than argument1

== represents IF, ? represents THEN and : represents ELSE here

Note: You use == for integer and .equals("") for string output.

Ex: row2.status.equals("Active")?"Select":"Ignore"

Tuesday, May 5, 2020

After a worker is created, you can't update or delete the user information or roles though the worker service. Make updates though the User service


HDL Error: After a worker is created, you can't update or delete the user information or roles though                       the worker service. Make updates though the User service

If you have already loaded the worker you can not use Worker.dat file to load User Information. Worker.dat file can only be used at the time of new worker creation, if the worker already exists in the system then you need to use User.dat file to add/remove roles or to update the user account information.

In the User.dat file, discriminator User accepts only one role per user at a time. If you want to add multiple roles for a user at the same time, please use UserRole discriminator.

Saturday, May 2, 2020

HDL Error ORA-01000: maximum open cursors exceeded

While uploading large volume of data in Cloud/EBS you may encounter this error message. The solution is to increase the value set for open_cursors for the session.

It was easy to amend this value in EBS
ALTER system SET open_cursors = 1000 scope=both;

But in Cloud you do not have access to do so but you can try optimizing the HDL performance.
Increase the size of below parameters in the HCM Data Loader configurator.

Maximum Concurrent Threads for Load
Load Group Size

The recommended value for the number of threads is 8, and for say 50,000 records in a batch, a Chunk size of 500 could be used to give decent throughput.

Navigation> Setup and Maintenance > Configure HCM Data Loader

If it doesn't improve the performance please raise a service request with Oracle and they will increase the value for open_cursors parameter.

Ref: (Doc ID 2066732.1)

Friday, May 1, 2020

Defining New Source System Owner for HDL in Oracle Cloud

For HDL either you can use User Key or Source Key. To go with the source key, a source system owner must be defined. To do so, you need to add a new lookup code in the HRC_SOURCE_SYSTEM_OWNER lookup type.

Roles Required: "Application Implementation Consultant"
                            OR "Human Capital Management Application Administrator"
Use the Manage Common Lookups task in the ''Setup and Maintenance' work area under 'Other' 

Or 'Settings & Actions' window for your user and select  'Setup and Maintenance' under 'Administration

Now if know the functional area, search Task for 'Manage Common Lookups' 

or click on the little window to the right hand side and 'Search' for  'Manage Common Lookups'

> Search for the lookup type HRC_SOURCE_SYSTEM_OWNER. 

> In the Lookup Codes section of the page, click the New icon to add a new lookup-code
> Save & Close

select lookup_code
      ,meaning
      ,description
 from fnd_lookup_values
where upper(lookup_TYPE) ='HRC_SOURCE_SYSTEM_OWNER'
  and enabled_flag = 'Y'

Tuesday, April 14, 2020

OAF personalization - Java Script

Recently I got a requirement to change the default option from 'New Bank' to 'Existing Bank' on the iSupplier bank details page. 

This cannot be achieved by the direct personalization as values are being set dynamically. The value for ‘Existing Bank’ is ‘OLD’ and ‘NEW’ for ‘New Bank’. The inherited value is already ‘OLD’ but at the run time it is being set as ‘NEW’ and the default radio choice is ‘New Bank’ instead of ‘Existing Bank’.
With the help of my very good friend Vikram, I achieved it with java scripting.

To achieve this functionality, we need to write some java script which can overwrite the initial value to ‘OLD’. Components involved

   > Java & HTML script
   > OAF Personalization

First, to know about the logic, right click on the radio choice, ‘New bank’ and select ‘Inspect’ (it might possible you won’t able to perform this in IE, either use chrome or press F12)
Here you can see the logic how radio choice being selected; this is after the solution so you are seeing ‘OLD’


We tried first
<script>window.onload = document.querySelector("input[name=BankSelectChoice][value=OLD]").checked=true;</script>

In the ‘Console’ you can test your script before doing the actual personalization.


This Worked on Chrome but did not work on IE -- Depends on IE version and developer mode set, even the IE version is 11 but if developer mode is set as 5, the below script won’t work in IE.
If you change the developer mode more or equal to version 9, it would work as querySelector is not avaliable to less than IE9.


So the final Java & HTML Script
Ø  Script is finding the value of the Radio Choice BankBranch and setting the click when it is finding ‘OLD’ at the time of window load. OLD is the value for ‘Existing Bank’ or ‘Existing Branch’.

Ø  It is setting up ‘Bank Branch’ only because ‘Bank’ choice is dependent on the ‘Bank Branch’ choice. ‘Bank’ choice will change according to the ‘Bank Branch’ choice.

<script>
function xxakde() {
var x= document.getElementsByName("BankBranchSelectChoice");
var i;
for (i = 0; i < x.length; i++) {
  if (x[i].type == "radio") {
    if (x[i].value=="OLD") {
    x[i].click();
    }
  }
}
}
window.onload = xxakde;

</script>

Please Note: This can be done in a single script as above, but I have modularized it for better understanding and created two scripts. 

1> First to create a function to find the set the appropriate value 

<script>
function xxakde() {
var x= document.getElementsByName("BankBranchSelectChoice");
var i;
for (i = 0; i < x.length; i++) {
  if (x[i].type == "radio") {
    if (x[i].value=="OLD") {
    x[i].click();
    }
  }
}
}
</script>

2> Secondly, a wrapper function to call the above function on the window load

           <script>function xxdef() { xxakde();} window.onload= xxdef(); </script>


OAF Personalization


Responsibility: iSupplier Profile & user Manager > ‘Supplier details’ > ‘Banking Details’ 
Click on ‘Create’ Button' > ‘Personalize Page’

Choose ‘Complete View’ and ‘Expand All’

Now click on ‘Create Item’ symbol under the last topmost Region so that the custom items will be sitting at the end and easy to find.


ID: Any Suitable ID as per the Home Group naming standard EX: XXAKDEFAULTBRANCHOPTION
Leave the other properties with default values and ‘Apply’


Similarly, create another item
Choose Level as ‘Site’, Item Style as ‘Raw Text’ and modify below properties
ID: Any Suitable ID as per the Home Group naming standard EX: XXAKDEFAULT
 

Leave the other properties with default values and ‘Apply’
It should look like as below, click on ‘Return to Application’


It should do the job


Wednesday, March 25, 2020

'Java was started but returned exit code 1' Error

Please check the correct java version is installed and java environment is set correctly.

'java -version' in command prompt (cmd) will show you the java version installed
'where java' will show you the java location


Ensure proper version of JDK is installed, you can download JDK from here.
Set the JAVA_HOME environment variable.


Oracle SQL Developer - Increase size of GUI/Font

When you are running SQL Developer on Windows 10, you need to change the compatibility accordingly to get the proper GUI size.

With default compatibility mode 


Change the compatibility mode

1> Right Click on SQL Developer icon and select Properties.
     > Go to the Compatibility tab
     > Compatibility mode change it to windows 7
         > Check the option of Override high DPI scaling behaviour
         > Select "System" in drop down below
6> Apply 

Re-Launch the application


Friday, March 6, 2020

How to use Parameters - Web ADI

Many friends commented about parameter use while importing pl/sql API or concurrent program. Sorry for very late post but here you go.

You can create parameters in the 'Uploader' section.

It can be of four types:
None
Value Set
Fnd Lookup
Bne Query - Simple/Complex

Here I am showing you Bne Query type, Go to 'Uploader' section your integrator and 'Add Parameter'


Provide the details as below and note down the Parameter name, Apply


Provide the details as below and note down the Parameter name


Apply and it should look like this


Now, next and move to the 'Importer' section, here I am calling PL/SQL API. Same will be applied to Synchronous/Asynchronous concurrent request call.


Under the Importer Rule section add the PL/SQL API Call rule.

For source, you have four options
Environment Variables
Import  -- Attributes reference of the 'Interface' section, the value you pass from the Spread sheet
Interface Table
Uplaod Parameters 

Here I am showing how to use parameters we created above and the Environment variables
$env$.userid: returns the current user ID
$env$.appid: returns the application ID
$env$.respid: returns the responsibility ID


And these parameters will appear when you upload the data and Importer will be called