Friday, March 13, 2026

Prevent merged columns when utilizing .xpt templates and exporting to Excel

Prevent merged columns when utilizing .xpt templates and exporting to Excel

When creating Oracle Cloud BI Publisher reports (.xpt templates) and exporting them to Excel, merged columns can hinder effective filtering in Excel.

To guarantee that filters function correctly in the Excel output and to avoid the automatic merging of columns during the report design phase, consider modifying the following report properties:

1. Edit report Properties
2. Navigate to Properties --> Formatting tab
3. Proceed to the 'EXCEL 2007 Output' section
4. Change "Keep Values in same column" from False to True


#Reporting #Oracle BI

Saturday, December 2, 2023

Update/Correct Payroll Relationship Number - HCM

A Payroll relationship gets created automatically when you hire an employee or create other types of person records, such as candidates and pending workers. A payroll relationship is an association between a person and a payroll statutory unit.

It is the same number as person number or assignment number(s) but few cases you would find where it doesn't matches or not in sync with person number.

How we can correct this?

There are two options:
1> Prerequisite: "Person Number Generation Method" must be set to Manual
                             (Setup & Maintenance > "Manage Enterprise HCM Information")
    > Now search the affected Employee from person management
     > Go to Manage Person, scroll down and edit the 'Person Number' and save/submit.
     > Re-search the employee and numbers should be in sync 

2.) If there are more than one employees affected or above option doesn't work run the 'Payroll Relationship Number Upgrade' process

     > First create a (Payroll > Object Groups) Payroll relationship Group with affected payroll relationship numbers
     > Then Payroll > Submit a Flow -> 'Run feature upgrade ' and select  'Payroll Relationship Number Upgrade' process

         >> Provide the above crated Payroll Relationship Group as free text in Additional Information field

It should solve the issue.

Thursday, October 5, 2023

Amend Notification Subject Lines

One of my clients had a requirement to change the notification subject line 

Ex: For 'Annual Leave' the original subject line is
'Approval of Annual Leave Request for XXX YYY from 2022-07-10 to 2022-09-10'

They want this to be changed as 'Annual Leave is Submitted Successfully for XXX YYY'

Lets see how we can achieve this

You can do this from BPM Task Configuration

Prerequisite: You should have  'Application Implementation Consultant' role 

Now go to BPM Worklist, there are two ways to go there 

1> Click on the bell icon on the home page and click on 'More Details'
        OR
2> Setup and Maintenance > Manage Task Configurations for Human Capital Management

Now go to 'Administration' > Task Configuration

Since this is Absence Approval so search for AbsencesApprovalTask


Now click on Edit pencil and then on Globe icon at the end of the Title


Now, keep the language English and give any key as 'DEMO_ABSENCE_TITLE' and in the expression provide the title you want Ex:  {0} is submitted successfully for {1}
{0} is the Absence Type and {1} is the person Name


Click on the 'Arguments' pencil icon and provide arguments for token {0} and {1}


Click on the expression builder icon
Now expand the Variables for task:payload > AbsenceApprovalrequest > AbsenceType 
and Insert into Expression 

It should be /task:task/task:payload/ns0:AbsencesApprovalsRequest/ns0:AbsenceType


Same for the token {1}
task:payload > AbsenceApprovalrequest > PersonName
and Insert into Expression 

It should be /task:task/task:payload/ns0:AbsencesApprovalsRequest/ns0:PersonName

Click on OK

Click on OK


And then Save, Commit and OK


And job done! :)

Wednesday, October 4, 2023

An internal assertion test couldn't be completed at location ReportUtils.callJavaClass5

 While running the 'Make EFT Payment' process for a terminated employee I have received the below error

Error An internal assertion test couldn't be completed at location ReportUtils.callJavaClass5

Error The bank account associated to this payment has a start date after the payment process date.

Issue was related to the personal payment method with that particular employee, there were two payment methods active for the payment period, please check if that is the case. After end dating one of those, EFT process went fine. 

It does happen when you create a new payment method and instead of doing "Correction" to the old one you do the "Update", which creates a date effective records.

Other solution is, you can set the 

"Historic Payment Removes the validation to look for active banks as of the process date in payments processes."

flag to 'Y' in the 'Payroll Process Configuration' for Default group, by default it is No. By the definition it will bypass the validation for inactive banks.

Navigation: My Client Group -> Show More -> Payroll Process Configuration under 'Payroll' section


Tuesday, September 26, 2023

FF: Exception in Trans to Main Mapping

Did you encounter the below error with fast formula? 


If yes, this means your formula body is not properly defined, please handle the no error section properly

-----------------------------------------------------

/*I assume your 1st part is working fine :)*/

IF <condition> 

THEN

(

<Expression>

)

ELSE

(

VALID = 'Y'

RETURN VALID

)

----------------------------------------------------------

Thursday, November 25, 2021

Create an Inbound Interface process using HCM Extract - Automated process to upload an HDL file (Part-2)

 We will be creating only a dummy HCM extract here just to use the 'Initiate HCM Data Loader' feature  as data extraction and transformation we are already doing in our BI report.

> My Client Group > Data Exchange > HCM Extracts > Extract Definitions 

Use the + sign to create a new extract of type 'Inbound Interface'


In the Parameters section add a parameter called Auto Load (Tag Name = Auto_Load) with Data Type as "Text" with Default Value as "Y". 
>> In new releases this parameter is already there but hidden. Click on 'Show hidden parameters' and update the Default Value to "Y" and Save


For the Data Group I have taken "PER_EXT_ASG_STATUS_DETAILS_UE" as User Entity as it returns very less row count.


Save
In Data group Filter criteria, I have put condition as "1=2" so that it doesn't return any data set
Edit > Put the condition 1=2 and 'Add Constant' and ‘Ok’
Save
In the Data Group create a Data Record and then a Dummy Attribute called "Dummy Field" with Data Type as "Text", Type "String" and string value has been passed as "Demo"
Dummy Record
Save, It will generate a fast formula and then create a dummy attribute


Now for the Extract Delivery Option, you can pass the details as below :
    Start Date               : 01/01/1901
    End Date                 : 12/31/4712
    Delivery Option Name     : HDLDemoOutput
    Output Type              : Text
    Report                   : <pass the BI Report path here ; 
                           Ex: /Custom/UoE Data Migration/UserCatHDLReport/HDLCallDemoRpt.xdo
    Template Name    : <pass the eText template name here;
                           Ex: HDLCallDemo
    Output Name              : HDLCallDemoOpt
    Delivery Type            : Inbound Interface
    Required/Bursting Node   : ticked


In the "Additional Details" section please pass the details as below :
   Encryption Mode          : None
   Override File  Extension : .dat
   Run Time File Name       : User
   Integration Name         : UserCategoryUpdate
   Integration Type         : Data Loader
   Integration Parameters   : blank
   Key                      : blank
   Locale                   : blank
   Time Zone                : blank
   Compress                 : Yes Compress
   Compressed Delivery Group: UserCatUpdate.zip

** Integration Name : 1st 8 characters will be used in the content ID name during the HDL call for this extract.
It starts with DL_<1st 8 characters from Integration Name  in upper case>_ProcessID 
              EX: DL_USERCATE_1092672
Save

Now navigate to Home --> My Clients Groups > Data Exchange > HCM Extracts> Refine Extracts
Search for the dummy HCM Extract which has been created. Select the HCM Extract and click on the "Edit" button.

Once the HCM Extract is opened, in the "Tasks" tab, under Flow Task the HCM Extract name will be present. Now click on the "Actions" button and select the option "Select and Add".


A search popup will appear and search the task "Initiate HCM Data Loader" (Generate HCM Data Loader file and optionally perform a data load). Now select the task and click on the "Done" button.
Save
Now select the task "Initiate HCM Data Loader" click on the "Go to Task" button.
             2 options will be there :
                    a> Data Loader Archive Action
                    b> Data Loader Configuration

Select the 1st option "Data Loader Archive Action".Click on the "Edit" button.
In the "Parameter Basis" dropdown, select the option "Bind to Flow Task".
In the "Basis Value" dropdown, select the option "Extract Name , Submit , Payroll Process"
                                              Ex: HDLCallDemo, Submit, Payroll Process

Now select the 2nd option "Data Loader Configuration". Click on the "Edit" button.
In the "Parameter Basis" dropdown, select the option "Constant Bind".
In the "Basis Value" multiline text box, please provide the below details : ImportMaximumErrors=100,LoadMaximumErrors=100,LoadConcurrentThreads=8,LoadGroupSize=100

Now click on the "Next" button and then click on the "Submit" button. You might get error to compile the fast formula, please do so. You can ignore the warnings

It's time now to submit the HCM Extract and check the Inbound Interface process. 

HCM Extracts > Submit Extract


You can check the 
HCM Data Extracts > View Extract Results


In case of any error, you can download the report for the last stuck process from the Instance Details and check for the error details


Now check if it has triggered the HDL load or not

HCM Data Loader > Import and Load Data

‘Show filters’ and remove your User Name and search as it won’t be against your User. You can see the Data Set been called, content ID/Data Set Name explanation has given above.


Import and Load both are successful, so it's all good at the end :)

Thursday, October 28, 2021

Create an Inbound Interface process using HCM Extract - Automated process to upload an HDL file (Part-1)

There are requirements where you need to rectify an existing record in fusion. Today's topic is to create an user friendly automated process to extract the existing record, transform it and load the same using HDL on a single click.

So to achieve this we would be creating an inbound interface process using HCM extract and BI report.

I am sharing step by step process with a simple example here which I had created with the help of my good friend Pavan.

Let's start, we would update the User Category of a person record. 

1> Create an BI report to extract and transform the existing data in an HDL format

     > Prepare an extract query

SELECT '1' KEY

               ,'MERGE|User|'||papf.person_number||'|EMPLOYEE_USER' mdata

   FROM  fusion.per_users            pu,

                per_all_people_f            papf

WHERE pu.person_id IS NOT NULL

      AND pu.active_flag = 'Y'

      AND papf.person_id = pu.person_id

      AND ( (trunc(sysdate) BETWEEN papf.effective_start_date

               AND papf.effective_end_date)

                  OR papf.effective_start_date >= trunc(sysdate)) 

      AND  person_number is not null

      AND papf.person_number = '169980'

> Now create a Data Model

             >  Tools > Reports and Analytics > Browse Catalog > New > Data Model


                  Data > View > Export > It will create an XML output


   > Based on the above XML data now create an RTF template 


 > Save the DM under Custom folder and create a report using this RTF template, make sure your repot is referring to the correct DM

                Please note down the 

                Template Name: HDLCallDemo and the  

                Report Path:/Custom/HDL Call Demo/UserCatHDLReport/HDLCallDemoRpt.xdo 

           > Now create bursting with the report template name

           > And add an additional permission  

               Search for 'Enterprise Scheduler Job Application Identity for HCM' under All and add


          > Now check if report is returning the data


2> Lets move on to creating an Extract (Part-2)

Tuesday, October 19, 2021

HDL: End date a record/Alter the Effective Start date through HDL

 If you just pass the EffectiveEndDate field in an HDL load to end date any component, it would create a date track entry. 

To end date a record completely you should also use ReplaceLastEffectiveEndDate field with value 'Y' 

Similarly to alter the EffectiveStartDate, you need to use ReplaceFirstEffectiveStartDate field with value 'Y'

Wednesday, October 28, 2020

HCM: Delete HCM Data Loader Stage Table Data

This job purges the HCM Data Loader staging tables for the data sets identified by the parameter values.

1> Either you can schedule this job 

*** Note: When you run the HDL job 1st time it checks whether the 'Delete HCM Data Loader Stage Table Data' job is scheduled or not. If not, then the HDL process creates a schedule for 'Delete HCM Data Loader Stage Table Data'  automatically.


2> Or when you want to 'Delete' the load entry from the 'Import and Load Data' load list, it calls this job for that data set.


Friday, September 25, 2020

HCM: The Regular/Temporary and Full Time/Part Time fields default to Regular and Full Time for all workers

 While migrating the workers we noticed that 'Regular or Temporary' and 'Full Time or Part Time' are getting auto populated with default values 'Regular' and 'Full Time' even though we are not passing the values for these fields.

These values are coming from the Position assigned and the reason is 'Position Synchronization Configuration'. 

Navigation: Setup and Maintenance > Search > Manage Enterprise HCM Information


Now the problem was, we were not even providing these values in the position load and system was still populating these fields with default values. This seems to be a bug.

The workaround is to pass the #null values to FullPartTime & RegularTemporary fileds in the position load file.

So to rectify the assignment records, you need to update the positions first and then run the ''Synchronize Person Assignments from Position". This process would only work if "Allow Override at Assignment' flag is unchecked. If it is also checked unfortunately you have to update the assignment records.

HCM: Default Number, Date & Time Format

 These default formats are controlled by profile options.

Navigation: Setup and Maintenance > Manage Administrator Profile Values


Profile Option Code:

Number: FND_NUMBER_FORMAT

Date     : FND_DATE_FORMAT

Time    : FND_TIME_FORMAT

You can set these options on Site or User level from the list of values available as required.


HCM: Workers Auto Numbering & Duplication Check

 Auto numbering and person duplicate check options are available under enterprise information. You can amend as required 

Navigation: Setup and Maintenance > Search > Manage Enterprise HCM Information


'Enterprise Information' Section

Options are self explanatory for both number generation and duplicate check. 
If you want to start the person number from a specific range you can provide that value in the 'Initial Person Number' filed.


Wednesday, July 8, 2020

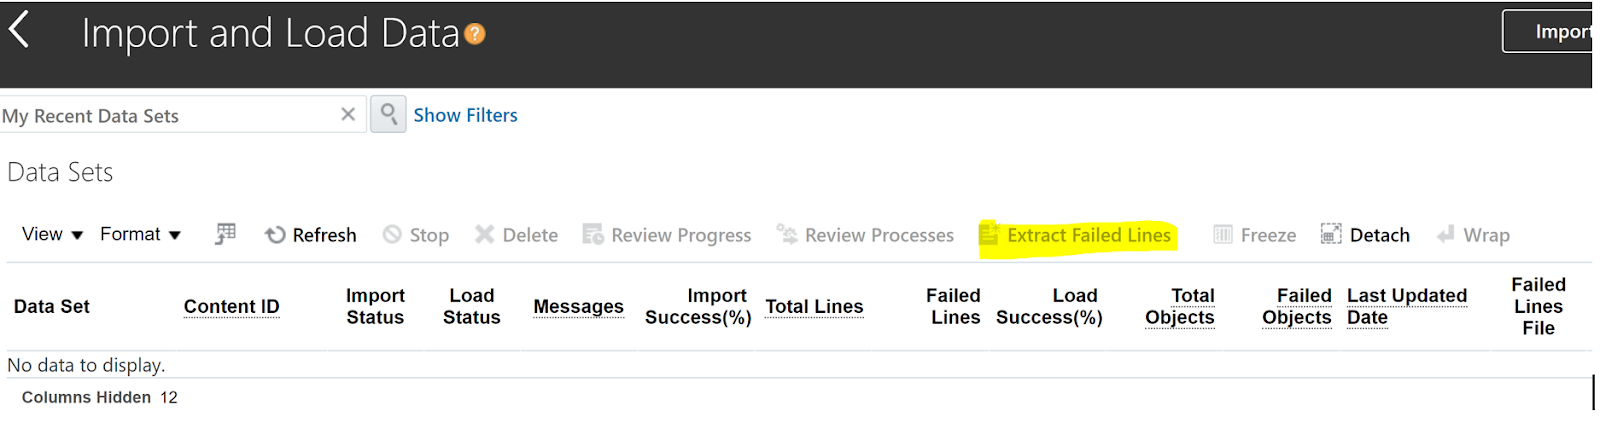
HDL: Extract Failed Lines

From version 20B there in an extra feature been added in the import load data section which is quite useful.

You can now generate the load file only for the failed rows from the import and load screen. You just need to enable this option

Setup and Maintenance > HCM Data Loader > Configure HCM Data Loader


It will enable the 'Extract Failed Lines' option on the Import and Load screen


Just to note that, it works quickly if number of failed line are less but it will take time in case of large volume of failed data.

Talend: Import/Export Items


Export: You can export multiple items from the project onto a directory or as an archive zipped file


1.       In the Repository tree view, select the items you want to export, you can have multiple selections as well


2.1 You can either go with the root directory or Archive file method. Root directory will create the files in the selected folder along with the parent tree structure

Export Dependencies check box exports the routine dependencies along with Jobs you are exporting (Ex: Related File Excel mappings, DB connection etc.)


2.1.1 It created the Project Name and the all the related job files.


2.2 Archive file option will create a ZIP file at the destination
      Export Dependencies check box exports the routine dependencies along with Jobs you are exporting


2.2.1 Zip file created


Import:

1    1.  Right click on the folder or Job design and select ‘Import items’


2.1. The Root directory option will create the structure the way it was exported. You can select individual items as well.
Overwrite existing items check box overwrites the existing items with those having the same names to be imported.


2.1.1 Result will be as like below


2.2 Archive file option will also give you the same result